Drywall Repair is a common home improvement project that can be fairly simple to tackle. Whether you have small holes from nail or screw damage, dents caused by hanging things on the wall, or cracks from the house settling, there are a few steps you can follow.
Using drywall mesh tape and a putty knife, you can patch a hole and then apply a light coat of drywall mud or compound. This can then be sanded smooth and primed and painted to match the surrounding surface. Click the https://www.professionalhomerepairservice.com/ to learn more.
Cracks in drywall are common and often appear around doors, entryways or windows. They are a result of the stresses put on drywall by movement in the house or settling of the foundation. While a crack in one or two places is not a huge concern, large jagged ones are and may signal a structural problem that requires professional attention.
The easiest way to fix thin cracks is by using a drywall patch kit. These come with a reinforced center panel and self-sticking tape that is applied to the wall with drywall compound. Make sure the crack is fully covered and that the compound dries completely. If you have a very wide crack, it may need to be reinforced with a piece of wood to ensure that the wall stays together.
When the crack is dry, you can use a putty knife to smooth and feather the edges so it blends in with the rest of the wall. You should then apply a second layer of drywall compound and let it dry completely. You can also use a fine grit sanding sponge to smooth the area. It is important to get the sanding done correctly so that there is no visible line where the patch meets the rest of the wall.
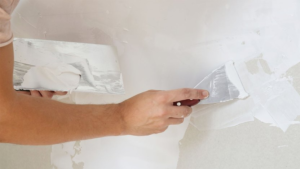
A crack that extends across a seam is more difficult to repair, but can be done with a few different materials and tools. First, use a utility knife to widen the crack and make sure the drywall tape has pulled loose from the wall surface (Image 1). If it has, replace it. Spread a coat of drywall compound on both sides of the crack, making sure to cover it all the way to the end of the tape.
Once the drywall compound has dried, use a putty knife to smooth it and feather the edges so that it blends in with the rest of the drywall. Once again, it is important to sand the area so that there is no visible line where the drywall patch meets the rest of the wall.
Holes
Drywall is very resilient, but it’s not immune to physical damage. If you knock a nail into the wall when hanging a picture, or break off a piece from a hook that’s been on the wall for years, it may leave a hole. You can fix small holes easily with spackle or joint compound. You’ll also need a putty knife, sandpaper and paint.
Depending on the size of the hole, you can choose to use paper or mesh joint tape. Both will work just fine, but if your hole is particularly large you should use mesh. Mesh is stronger than paper and will prevent the hole from weakening further down the road.
Before applying any patch, make sure that the area is clean and free of dust or debris. It’s also important to know where your electrical and plumbing lines are before cutting into the wall. Turn off any power and use a utility knife to cut around the outside of the hole, making sure that you don’t cut into the pipe or electrical line.
Once you’ve cleaned and prepped the area, use a drywall knife to apply a thin coat of joint compound over the entire area surrounding your hole. You want it to be very thin, so it doesn’t take too long to dry. After the first coat of compound has dried, apply another thin coat over it and sand once again.
Then you’re ready to add your patch. If you’ve done the prep correctly, it should be a perfect fit. If not, you can adjust it as needed.
Before adding your patch, cut two pieces of 1×2 wood that are slightly longer than the hole’s height. Apply construction adhesive to the back of the strips and press them into place in the hole, ensuring that they’re recessed slightly from the surface of the wall.
Then screw your new patch into place. If it doesn’t adhere, try adding more mud to the back of your patch.
You can also use a screw gun to get the job done quickly. When you’re done, you can sand and smooth the hole, then apply a fresh coat of paint to match the rest of the wall.
Water Damage
Water damage is one of the most severe issues that can affect drywall and cause homeowner headaches. Drywall is made out of absorbent materials such as gypsum and cardboard-like paper, so when it gets wet it can warp or even collapse. The longer the drywall is wet, the worse the damage can become. In addition, water damage can lead to mold problems and health issues if not properly repaired. The first step in repairing drywall that has been affected by water is to locate and address the source of the problem. This may require a professional to remove any mold spores and thoroughly dry the area. Once this is done, the drywall can be replaced and prepared for paint.
When repairing drywall that has been affected by moisture, the first step is to clean the surface. This can be done by using a utility knife or a sander. Once the surface is clean, it’s important to let it air dry before moving on. If the drywall is severely damaged, it will need to be removed and replaced. After the new piece is installed, the seams can be covered with joint compound or drywall tape. After this, the area can be sanded and smoothed to ensure that the repaired section looks seamless.
In severe cases of drywall water damage, the best option is to call a professional to perform repairs. A professional will be able to provide detailed inspections and assessments of the condition of the drywall, ensuring that all issues are addressed and that the repair work is of high quality. In addition, a professional can offer services such as sanding and painting to make sure that the repaired area matches the rest of the wall.
Drywall repair can be a daunting task for homeowners, but with proper knowledge and preparation it doesn’t have to be. By assessing the severity of the drywall damage, gathering necessary tools and supplies, removing and replacing damaged sections of drywall, and taking steps to protect yourself from mold, you can be confident that your home’s drywall is in good hands.
Mold
Drywall is a cost-effective building material, but it’s susceptible to water damage and mold. Mold damage to drywall isn’t just unsightly – it can also cause serious health problems, including allergies, asthma and even permanent lung damage. It’s important to address mold damage in drywall quickly and professionally.
It’s easy to identify when there’s mold in drywall, since it usually looks like black splotches and has musty odors. Besides visual inspection, you can also use a DIY kit to test for mold and other types of deterioration in walls, such as drywall rot or wood rot. Alternatively, you can hire a professional to do a more thorough test.
If you discover mold in drywall, it’s best to open up the wall and remove it as soon as possible. This will prevent the mold from spreading to other parts of your home, such as insulation and the studs and joists inside the walls. If you can’t afford to replace all the drywall, do your best to salvage the least-affected portions and treat them with mold-killing chemicals.
Start by shutting off power to the area at the electric service panel and identifying the location of drywall studs with a stud finder or a magnetic stud detector. Next, use a prybar to carefully chip away any soft or mold-covered areas of the drywall and pull it off. Place the removed drywall in large contractor bags to contain the mold.
If the drywall is painted, spray it with a mold-killing solution such as bleach or Concrobium Mold Control. Be sure to wear a mask when spraying to reduce inhalation of loosened mold spores. After spraying, scrub the affected surface with a brush and let it dry thoroughly, pointing a fan at it to speed up the process.
If the drywall is unpainted, it’s much more difficult to remove. You’ll probably have to cut out and replace the drywall, but it’s still worth trying to save as much of it as possible by treating the mold with cleaning solutions. Then you can replace it with fresh drywall and apply a fungicidal primer with a fungicide sealer to prevent further mold growth.