A deck provides a space for entertaining friends, watching the sunset or enjoying a book with quiet solitude. Its versatility and multipurpose nature require careful planning to ensure the proper structure.
Home improvement books and TV shows recommend plotting footing locations with batter boards and string. However, it’s faster and more comprehensive to build a layout frame from joists or deck boards. For professional help, contact Deck Builder Stafford.
A solid foundation is essential for any structure, and decks are no exception. The footings for a deck must be strong enough to support the weight of materials and people, as well as to protect the structure from ground shifts over time.
A variety of different types of footings are available, each with its own pros and cons. Poured concrete footings are a traditional and widely used option. They involve digging holes to a specified depth (below the frost line) and filling them with concrete. Concrete is extremely strong and stable, making it ideal for supporting heavy structures.
Another common type of footing is a pier and footing. This method uses a pier that extends below the ground and is supported by a footing that sits on top of it. This type of footing is relatively easy for a professional to install and provides good stability, but it is not as durable as other options.
A newer footing is the screw pile, also known as a helical pile. This type of footing is driven into the ground using hydraulic machinery. It is suitable in difficult soils, but requires specialized equipment and a professional to install. If you’re considering using this type of footing for your deck, be sure to discuss it with your building regulatory group before getting started. They may not be allowed in your area, or they may require special permit requirements.
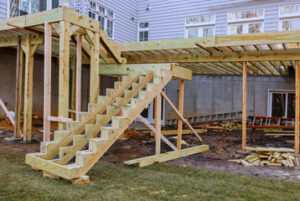
Beams
Beams, also known as girders, are the horizontal pieces of lumber that support your deck. The size of the beam is determined by the height of the deck and the spacing between joists. For example, if you’re building a low deck that’s six feet or less off the ground, it’s usually recommended to space beams at 12 inches apart.
If you’re building a taller deck, it may be necessary to install beams closer together. In addition, the length of the deck and your location will determine whether you need to install bracing. For this reason, it’s best to consult your local building department for advice on the deck’s design and footing depths.
Decks built from pressure-treated wood are typically supported by a system of posts and beams. The posts, which are attached to the footings, elevate the deck floor and help strengthen it against movement due to weather conditions or shifting soil.
To build a deck, you’ll need 2 x 6s through 4 x 10s for the beams and joists, depending on how high you plan to build your deck. The joists are then attached to the beams with joist hangers.
The ledger is a piece of pressure-treated lumber that connects the posts to your house and supports the joists, which in turn support the subflooring. Historically, builders used massive timbers, such as 4x6s or 4x8s, for beams, but the use of smaller timbers can be easier to handle. Larger timbers can rot in some environments, so it’s a good idea to use treated wood for all parts of your deck.
Some designers are using a demountable composite construction system, which uses shear studs bolted to the flange of the beam. This eliminates the need to drill through concrete to attach services such as cable trays, pipes, and false ceilings, which can be dangerous. Some beams have re-entrant slots into which proprietary wedges can be inserted to receive threaded rods for these purposes.
Joists
The joists are the repeated boards that create the frame for the decking. They run perpendicular to the building and are fastened with galvanised joist hangers. You may also need to add a wood treatment or joist tape to protect the cut ends of the lumber from moisture damage and to minimise sound transmission between joists.
The standard spacing for joists is 16 inches on center but this varies with the type of decking you are using and your local codes or installation instructions. You may need to use a higher calibre timber to allow your joists to span a greater distance, especially in colder regions where frost heave is an issue.
When installing the joists, you will need to ensure that they are level. To do this, run a string across the frame during construction. If the string shows that one joist is higher than the others, you can either replace the joist or shim it up to bring it into line with the rest of the frame.
To prevent sagging, it is a good idea to install the joists at least 4 or 5 feet below ground level. This will help prevent frost heave from raising the deck in winter, which can cause the frame to sag and leave gaps for water to enter and damage the structure.
It is recommended to use a decking screw rather than nails to secure the joists as these are more durable and won’t enlarge through expansion and contraction of the timber caused by wetting and drying. It is also best to use structural screws that are made of a corrosion resistant material, as these will provide a stronger connection than nails. Remember to fill all nail holes with the appropriate screw as not doing so can compromise the stability, longevity and safety of your deck.
Piers or Posts
Depending on the design of your deck and soil conditions, you may decide to use either piers or posts for the foundation of your deck. This is a crucial step in deck building, as the type of foundation can impact the stability and longevity of your structure. In general, piers are more cost-effective and easier to install than footings, but they may not be suitable for all applications. Before deciding to use piers, homeowners should carefully consider the design of their deck and the soil conditions on their property to ensure compliance with local codes and safety requirements.
Concrete piers are typically a good choice for large decks that require more support than what is provided by the soil. They are typically poured on-site, which can be time-consuming and labor-intensive. This method of foundation also has the disadvantage of concentrating the load on a smaller area, which can lead to structural problems over time.
One alternative to concrete piers is using pre-formed pier blocks. These pre-formed piers are typically made of concrete or plastic and are a much faster and simpler installation option than digging and pouring traditional footings. Pier blocks are also less expensive than concrete piers, but they can still add to the overall cost of your deck build.
Another option for deck foundations is a strip footing. This method requires a narrow strip of concrete that is poured on site, which can be more efficient than digging and pouring individual piers. However, this method can be problematic in areas with changing soil conditions and can increase the amount of maintenance required for the structure. In addition, this foundation method can be difficult to install on sloping ground.
Railings
Railings provide safety and a finished look to your deck. They can be built from wood, metal, or composite materials and are available in a wide variety of styles. It is important to determine code requirements, choose your material, and create a layout when planning for the installation of a new railing system. Often, permits are required for the installation of decks and their railings.
The first step in determining what type of railing to install is deciding how high you want the rails to be. This can be determined by a number of factors, including code requirements and the height of your home or other buildings. Once the height is determined, it is important to measure and mark the location of the bottom of the rail posts. This will ensure that the bottom rails are installed at the correct height and will not sag between posts.
Another factor to consider when choosing a railing material is the cost. Wood can be a very cost effective option, but some prefer the strength and durability of metal or composite materials. It is also possible to purchase pre-fabricated railing systems that are very cost effective and easy to install.
Several pieces of hardware are required when building a deck, such as hurricane ties and joist hangers. These are used to connect joists and help with load distribution. In cold climates, a ledger board is also needed to prevent frost heave and allow for proper support of the joists and noggins. A fascia is also required, which conceals the understructure of the deck with more attractive material.
